


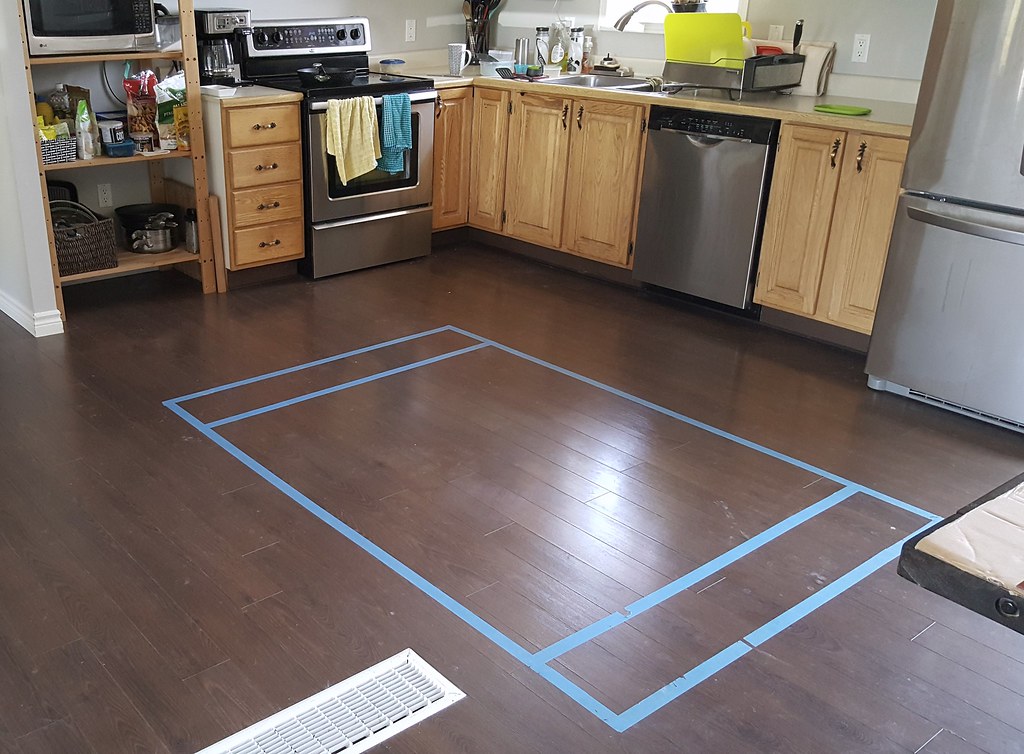
We have a limited amount of counter space in our kitchen, while also having a large open space that is unused. We've always planned on including an island once we renovate.
One day I grabbed the painters' tape and marked out an area on the floor that I thought would be a suitable size (about 3.5 feet by 6 feet). That still left about 42 inches between the cabinets and the island and even more space on the far side towards the living room. Can you believe how much unused space there is! Nothing's been pushed out of the way - that's how it looks every day.
When Tom got home, he looked at it for a while and then commented that the taped area looked about the same size as the dining room table. Indeed it was, so we immediately dragged the table into the kitchen area. We figured that with a 3-dimensional replica we'd have a better idea of whether or not an island would work for us. I put cardboard over the tabletop to protect the wood, and then a flat sheet over that, to make it a little nicer to use. We did have to wash that sheet a lot though.
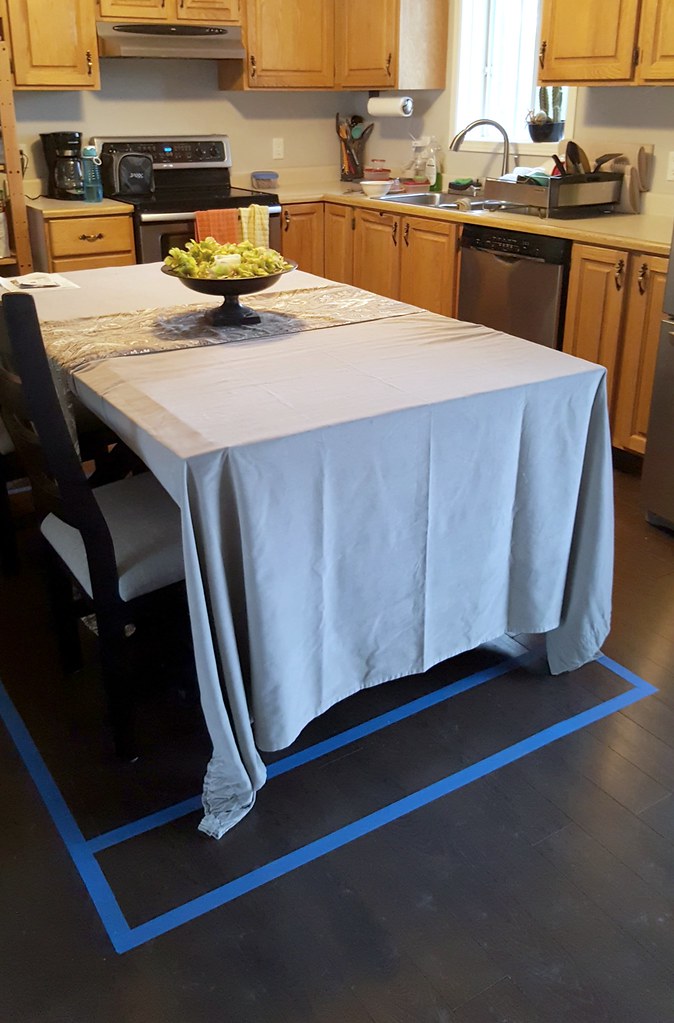
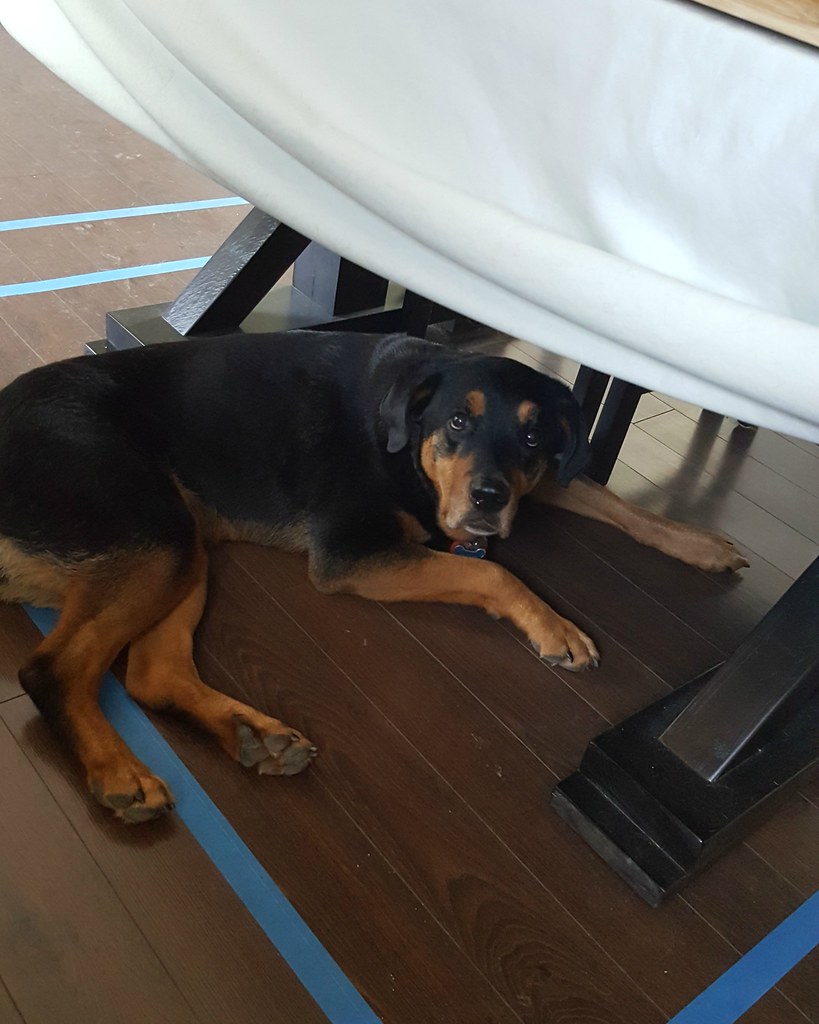
Right away we enjoyed having the extra prep space, and we didn't find ourselves bumping into it or feeling like it was in the way of our activities. Sasha even enjoyed having a new hiding spot where she could watch us cook up close. "Sunday Night Lunch Prep" is her favourite show.
So we knew we definitely wanted an island, but we didn't want to wait until we renovated the kitchen to have it. We decided to build a butcher block-style island with open shelving underneath - a simple design that would give us all the counter space we needed and some additional storage space.
Tom had seen a bamboo tabletop at Lowe's that was the same size as our dining table, and he knew that there was no way we'd be able to build one for the same price. We bought it and used it on top of the dining room table for a while until we were ready to build the base. We bought 4x4 cedar posts for the legs, 2x4s for the framework, and 1x2 slats for the shelf.
How we built it:
1. First we determined how high we wanted the island. We settled on 38 inches, which was 2 inches higher than the other kitchen cabinets. And if it ended up being too tall we could always shorten the legs. We cut the 4x4s to 36.5 inches. We also angle cut the bottom of the legs (the feet) so that they wouldn't scratch the floor if the island was moved around (we also added felt pads for this).


3. Next the 2x4s were cut to make a horizontal framework between the legs - 2 at 32 inches and 2 at 65.5 inches. One extra step we took was to plane the 2x4s on the edge that would be against the tabletop so that it sat flush (2x4s are slightly rounded on the edges).

4. We added 2x2s (cut down from the 2x4s) inside the 2x4s. A framework within the framework. The 2x2s are attached both to the underside of the tabletop and sideways into the 2x4s. We did this so that there are no visible screws on the outer framework. They were glued in place and then also screwed in horizontally and vertically.


5. Next the pilot holes for the leg screws were drilled through the legs into the 2x4 framework. The screws that we used - GRK structural screws - have a fancier head that look a bit like carriage bolts. We countersunk the holes so that the screw heads were flush with the wood.


6. We built the lower shelf framework in the same way as the upper framework, i.e. 2x4s horizontally running between the table legs. We also included cross pieces at the corners and down the center for added strength and stability. The corner cross pieces are attached to the framework using pocket screws (here is a link to a terrific little pocket hole jig kit that we use all the time), and the center board is attached from the outside with countersunk structural screws.

7. The shelf is 38 inches wide. Tom rough-cut the slats (1x2s) to about 39 inches - using one cut slat as a guide for the rest. We tacked two spare boards along one long side of the shelf framework to act as a jig that the slats would butt up against. This keeps them all lined up on one edge while you're arranging them. Several other slats were cut shorter to fit between the table legs at each end.


8. Once all of the slats were laid in place, Tom ran a pencil along the underside of the slats that overhung on the open side of the shelf and cut them along the line so that they would be exactly the same length. The slats were put back on the frame and were air nailed into place. The jig boards could then be removed.

9. I sanded all of the new wood twice, once with a medium grit sandpaper and then again with a fine grit. The island top of course doesn't need to be sanded.

10a. Each of the different types of wood (cedar, bamboo, and pine) were different shades. The bamboo top and cedar legs were very close to each other so I chose to only stain the pine framework and slat shelf. I always seem to have several different stains on hand. I tested them out on scrap wood. and Minwax Provincial came the closest to the shade of the cedar and bamboo. I did test the stain on a scrap piece of cedar, just to see. It absorbed a lot of stain and went far too dark, confirming my decision not to stain the legs.
10b. I taped off the top and the legs to protect them, then applied two coats of stain with a soft cloth, letting it dry between coats. Applying stain with a cloth allows you to control the amount applied and you don't have to come back and wipe the excess off later. Once the second coat of stain had dried I removed all of the painters' tape and wiped the entire table down one last time.


We did have to take the island apart again to get it upstairs, but that's one good thing about the legs not being attached to the table top - we were able to undo the leg screws, take the pieces upstairs, and bolt it back together.

One more step: The bamboo top needs to be oiled regularly, especially when you first buy it. We just use generic food-grade mineral oil, wiping it all over the top, following the grain, and waiting for it to dry before using the tabletop again. If you do it at night before bed, you can leave it to dry overnight.

At first I was worried that the island would be too high, being higher than the other cabinet counters, but it is the perfect height. I have no complaints at all. And that huge shelf underneath gives us a place to store all of those small appliances that get in the way.
After having it for a few weeks, it's hard to imagine life without it.


Right away we enjoyed having the extra prep space, and we didn't find ourselves bumping into it or feeling like it was in the way of our activities. Sasha even enjoyed having a new hiding spot where she could watch us cook up close. "Sunday Night Lunch Prep" is her favourite show.
So we knew we definitely wanted an island, but we didn't want to wait until we renovated the kitchen to have it. We decided to build a butcher block-style island with open shelving underneath - a simple design that would give us all the counter space we needed and some additional storage space.
Tom had seen a bamboo tabletop at Lowe's that was the same size as our dining table, and he knew that there was no way we'd be able to build one for the same price. We bought it and used it on top of the dining room table for a while until we were ready to build the base. We bought 4x4 cedar posts for the legs, 2x4s for the framework, and 1x2 slats for the shelf.
How we built it:
1. First we determined how high we wanted the island. We settled on 38 inches, which was 2 inches higher than the other kitchen cabinets. And if it ended up being too tall we could always shorten the legs. We cut the 4x4s to 36.5 inches. We also angle cut the bottom of the legs (the feet) so that they wouldn't scratch the floor if the island was moved around (we also added felt pads for this).
2. We turned the tabletop upside down on sawhorses and set the legs in place to determine how much of an overhang we wanted. The legs are slightly inset - about 1/2 an inch - and then the horizontal framework is inset just about a 1/4 inch more, so that the flat, cut edge of the 2x4 meets up with the flat of the leg.
3. Next the 2x4s were cut to make a horizontal framework between the legs - 2 at 32 inches and 2 at 65.5 inches. One extra step we took was to plane the 2x4s on the edge that would be against the tabletop so that it sat flush (2x4s are slightly rounded on the edges).
4. We added 2x2s (cut down from the 2x4s) inside the 2x4s. A framework within the framework. The 2x2s are attached both to the underside of the tabletop and sideways into the 2x4s. We did this so that there are no visible screws on the outer framework. They were glued in place and then also screwed in horizontally and vertically.
5. Next the pilot holes for the leg screws were drilled through the legs into the 2x4 framework. The screws that we used - GRK structural screws - have a fancier head that look a bit like carriage bolts. We countersunk the holes so that the screw heads were flush with the wood.
6. We built the lower shelf framework in the same way as the upper framework, i.e. 2x4s horizontally running between the table legs. We also included cross pieces at the corners and down the center for added strength and stability. The corner cross pieces are attached to the framework using pocket screws (here is a link to a terrific little pocket hole jig kit that we use all the time), and the center board is attached from the outside with countersunk structural screws.
7. The shelf is 38 inches wide. Tom rough-cut the slats (1x2s) to about 39 inches - using one cut slat as a guide for the rest. We tacked two spare boards along one long side of the shelf framework to act as a jig that the slats would butt up against. This keeps them all lined up on one edge while you're arranging them. Several other slats were cut shorter to fit between the table legs at each end.
8. Once all of the slats were laid in place, Tom ran a pencil along the underside of the slats that overhung on the open side of the shelf and cut them along the line so that they would be exactly the same length. The slats were put back on the frame and were air nailed into place. The jig boards could then be removed.
9. I sanded all of the new wood twice, once with a medium grit sandpaper and then again with a fine grit. The island top of course doesn't need to be sanded.
10a. Each of the different types of wood (cedar, bamboo, and pine) were different shades. The bamboo top and cedar legs were very close to each other so I chose to only stain the pine framework and slat shelf. I always seem to have several different stains on hand. I tested them out on scrap wood. and Minwax Provincial came the closest to the shade of the cedar and bamboo. I did test the stain on a scrap piece of cedar, just to see. It absorbed a lot of stain and went far too dark, confirming my decision not to stain the legs.
10b. I taped off the top and the legs to protect them, then applied two coats of stain with a soft cloth, letting it dry between coats. Applying stain with a cloth allows you to control the amount applied and you don't have to come back and wipe the excess off later. Once the second coat of stain had dried I removed all of the painters' tape and wiped the entire table down one last time.
We did have to take the island apart again to get it upstairs, but that's one good thing about the legs not being attached to the table top - we were able to undo the leg screws, take the pieces upstairs, and bolt it back together.
One more step: The bamboo top needs to be oiled regularly, especially when you first buy it. We just use generic food-grade mineral oil, wiping it all over the top, following the grain, and waiting for it to dry before using the tabletop again. If you do it at night before bed, you can leave it to dry overnight.
At first I was worried that the island would be too high, being higher than the other cabinet counters, but it is the perfect height. I have no complaints at all. And that huge shelf underneath gives us a place to store all of those small appliances that get in the way.
After having it for a few weeks, it's hard to imagine life without it.

No comments:
Post a Comment